Wednesday, May 21, 2014

Version control with git

I've used UberSVN and TortoiseSVN for version control before, but I figured this time I will join the rest of the world and start using git.

I've played around with git before, but never started using it for real.  Why? I don't know. I'm sort of an idiot that doesn't version control a lot of my software. I would use subversion for work stuff, but for my own personal projects, I just build the software outright.  Generally, I don't really take on giant projects to pursue in my free time.

Anyway, here are my notes for setting up git.

Download

Unpack and then navigate over to your powershell window. It doesn't matter if you are inside your virutalenv.

Initialize git:
(django-jay) PS C:\Python27\home\jtarlecki\djcode\django-jay> git init
Add the project:
(django-jay) PS C:\Python27\home\jtarlecki\djcode\django-jay> git add rebates
Commit the project with a message (-m):
(django-jay) PS C:\Python27\home\jtarlecki\djcode\django-jay> git commit -m 'Initial commit of rebate_info api'
If you don't already have a git repository online, make one.  When you have one, create an online 'origin' for the local project.
(django-jay) PS C:\Python27\home\jtarlecki\djcode\django-jay> git remote add origin https://github.com/jtarlecki/rebate_info.git
Check on the origin:
(django-jay) PS C:\Python27\home\jtarlecki\djcode\django-jay> git remote -v
origin  https://github.com/jtarlecki/rebate_info.git (fetch)
origin  https://github.com/jtarlecki/rebate_info.git (push)
Push the code to your git repository.
(django-jay) PS C:\Python27\home\jtarlecki\djcode\django-jay> git push -u origin master
Magic.

Wednesday, May 14, 2014

Windows issues with using django inside a virtualenv

Following up on a post with starting from scratch with a Python install, I found that starting a django project (without any dependencies -- truly in a virtual environment) was a little more difficult than I expected.

Turns out that when I was another machine, I was using the global install of django rather than running the isolated one contained in my virtual environment.

When did I realize this? I tried to run the standard django-admin.py
(django-jay) PS C:\Python27\home\jtarlecki\djcode> django-admin.py startprjoect rebates
And I got this:

django-admin.py : The term 'django-admin.py' is not recognized as the name of a cmdlet, function, script file, or operable program. Check the spelling of the name, or if a path was included, verify that the path is correct and try again.
At line:1 char:1
+ django-admin.py startprjoect rebates
+ ~~~~~~~~~~~~~~~
    + CategoryInfo          : ObjectNotFound: (django-admin.py:String) [], CommandNotFoundException
    + FullyQualifiedErrorId : CommandNotFoundException
What's the issue? Well, windows really doesn't know about the Python executable created in the Scripts folder when the virtual environment is created, so instead we have to tell it explicitly about the module ((django-jay) PS C:\Python27\home\jtarlecki\djcode\django-jay> python -m django-admin startproject rebates) in which it should look to fire up python.  That and, we need to invoke the command with a leading python.  We also drop the .py from django-admin.py  Observe:

(django-jay) PS C:\Python27\home\jtarlecki\djcode\django-jay> python -m django-admin startproject rebates
Thanks stackoverflow.  Also, check out more info about in the python docs.

Setting up python

This is pretty trivial, but I just booted up a brand new computer and have been in the process of downloading things for hours.

1. Download/install python.  I use Python 2.7.

2. From powershell, run this to make sure you can run python from anywhere:
(django-jay) PS C:\Python27\> [Environment]::SetEnvironmentVariable("Path", "$env:Path;C:\Python27", "User")
3. Install PIP. Download get-pip.py, then run it from your powershell window:
(django-jay) PS C:\Python27\> python get-pip.py
4. Set the PATH environment variable to include the C:\Python27\Scripts directory
(django-jay) PS C:\Python27\> [Environment]::SetEnvironmentVariable("Path", "$env:Path;C:\Python27\Scripts", "User")
5. Quit out of powershell, and reboot it.  Now run the following command:
PS C:\Python27> pip install virtualenv
7. Download/install PostgreSQL (this gives you access to psql shell)

That's it for the stuff I need! I'll update this as it evolves.

Monday, May 5, 2014

Webservices with TastyPie


We're going to turn our Django model into a web service using the python package "tastypie"

What is tastypie? Honestly, I don't really know. But, I do know how to make it return .json and xml API-like resources for a properly set up database schema!

Let's install tastypie.  From inside our django project directory use pip:
(django-jay) PS C:\Python27\home\jtarlecki\djcode\django-jay\rebates> pip install django-tastypie
Let's also pip some additional xml support.
(django-jay) PS C:\Python27\home\jtarlecki\djcode\django-jay\rebates> pip install defusedxml "lxml>=3"

Now, let's create a new file inside our app (rebate) called api.py
(django-jay) PS C:\Python27\home\jtarlecki\djcode\django-jay\rebates> start notepad++ rebate\api.py

Inside api.py, append the following code
from tastypie.resources import ModelResource
from tastypie.constants import ALL
# constant ALL sets the types of query types we can perform on our models.
from models import Zipcodes

class ZipcodesResource(ModelResource):
 class Meta: 
  queryset = Zipcodes.objects.all() #this is everything in the zipcodes table
  resource_name = 'zipcodes'
  # basically, this give the url path
  # localhost:8000/<project-level-url>/<app-level-url>/resource_name/
When we first ran django-admin.py startapp rebate , django created a collection of files inside our rebate app:
+---rebate
¦       admin.py
¦       models.py
¦       tests.py
¦       views.py
¦       __init__.py
So, we just added api.py, now we need to add urls.py to our app to help give this thing some specificity within the app. It doesn't really matter where we put it (we could put this at the project level) but for now, let's leave it here:
(django-jay) PS C:\Python27\home\jtarlecki\djcode\django-jay\rebates> start notepad++ rebate\urls.py
Inside this app-level urls.py file, append the following code:
from django.conf.urls import patterns, include, url
from rebate.api import ZipcodesResource

#now that ArticleResource is imported, create an instance of it
zipcode_resource = ZipcodesResource()

urlpatterns = patterns('',
 url(r'^api/',include(zipcode_resource.urls)),
 # these urls are automagically created by our ModelResource class from api.py
)
To explain some of the comments above: we're going to pull in the ZipcodesResource() class from api.py then create an instance of it at runtime.  Then using some tastypie wizardry, the ModelResource class imported in api.py automagically creates some urls for us to use. Le'ts promise ourselves to read more about it here later.

At this point we are officially daisy-chaining some urls. Make sure your entire django project has some clue about its enclosed apps. Fire up the urls.py from the project directory  (rebates):
(django-jay) PS C:\Python27\home\jtarlecki\djcode\django-jay\rebates> start notepad++ rebates\urls.py
Inside rebates\urls.py, append the following url pattern:
    url(r'', include('rebate.urls')),
Basically, this is just a pass-through that allows the /api/ url we defined at the app-level to be the top-level url at the project-level. Confused? Yes, it is confusing.  If you mess around with it, you will get it.

OK great! Now lets run the server
(django-jay) PS C:\Python27\home\jtarlecki\djcode\django-jay\rebates> python manage.py runserver
And navigate our web browser to the following :

http://localhost:8000/<project-level-url>/<app-level-url>/resource_name/
or
http://localhost:8000/api/zipcodes/
as our <project-level-url> is simply a pass-through as described above.

Oops! Tastypie isn't the cleanest with urls.  You should see the following message prompting you to put a little additional info into your url
Sorry, not implemented yet. Please append "?format=json" to your URL. 
OK. Let's append that to the end of our url.

 http://localhost:8000/api/zipcodes/?format=json
Awesome! We get a response, along with some metadata to help give context for what the response actually is.

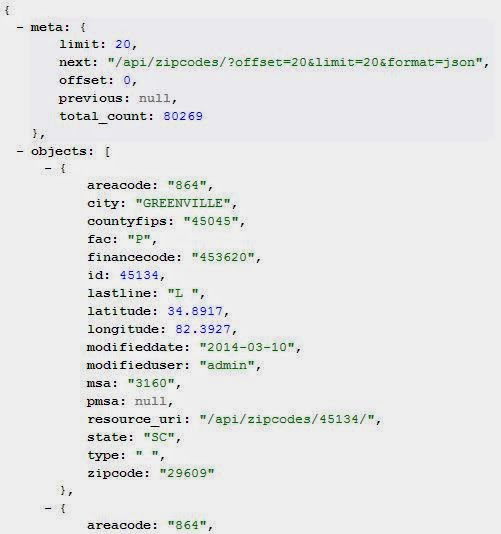
Its a big table, so tastypie by default gives responses in chunks of twenty (20) records.  Screen snippet above.
By default, tastypie also allows you to put a primary key number as the next-level-down url. Say we wanted to see the detail on the first object pictured above (id=45143), we could call it with the following url:
http://localhost:8000/api/zipcodes/45134/?format=json
 Which give the following resultant:
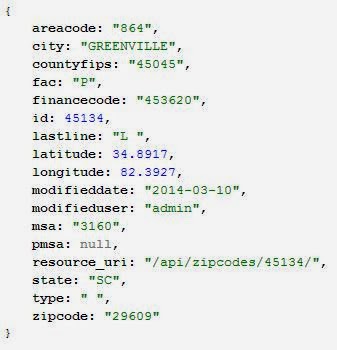
response
Some of you probably noticed the recouse_uri field annotated in the previous picture. All I did was copy that in to my browser. Notice that tastypie has a built in url pattern for primary keys of tables you hook into its built-in resources, which has the form:

http://localhost:8000/api/zipcodes/<pk>/?format=json
where <pk> is the primary key number from your table. 
I'm still getting xml errors because of something missing in my installed lxml.  I tried re-installing from pip, but still get the error. For now, I'm only concerned with .json responses anyway, so I'm just going to skip for now.

If we want to add a filter to our urls (say, we want a response based on a specific query), we can add a filter to the api.py file.  Let's say we want to search for zipcode information by zipcode, since someone who is using this api probably has no idea what our primary keys are in our database.

Thus, let's put a zipcode filter in our api.py file.. append the following inside the meta class of the  ZipcodesResource class:

  filtering = {
   "zipcode": ('exact'),
  }
There are many different filters you can add, but right now we will look at the exact match.

Access the following url

http://localhost:8000/api/zipcodes/?zipcode=19104&format=json

Voila! Now we have a list of zipcode info for 19104!  Read up on the tastypie docs for more info.

Automating table copying

In the last post, I discussed the miserable way I was copying over an entire database.  It sucks.  So I wrote a little python code to print out all the sql statements to sequentially paste into the psql shell.

 At first, I tried to automate the entire project from python, but I failed. I believe its because my PostgreSQL database is remote (and shared on my hosting) so only a true superuser can call the \COPY command from a remote script.  Basically, my point of failure hinged around the cursor class of psycopg, specifically the copy_expert command.  Now, that I am typing this, file size might have been an issue as well.  I'll come back to this at some point.... maybe.

I tried for about an hour or two, but then realized that my attempts and full automation were taking longer than me copying over the entire database with partial-automation.  These are tough decisions to make.  I decided to push forward with some text outputs that would allow me to run psql scripts and quickly achieve some table updates.

Anyway, here is the python code.

from sys import argv
import os

script, table_name = argv
csv_full_path = os.path.dirname(os.path.realpath(__file__)) + '\%s.csv' % (table_name)
sp = '''

###

'''

def printq(q, i):
 i+=1
 print 'QUERY (' + str(i) + '):\n'
 print q + '\n'
 return i
 
def main():
 n=0
 print sp
 
 #1) drop serialization of primary key
 query = "ALTER TABLE rebate_%s ALTER COLUMN id DROP DEFAULT;" % (table_name)
 n=printq(query, n)
 
 #2) copy in records
 query = "\COPY rebate_%s FROM %s WITH CSV HEADER;" % (table_name, csv_full_path)
 n=printq(query, n)
 
 #3) add contstaint back to database
 query = "DROP SEQUENCE rebate_%s_id_seq; CREATE SEQUENCE rebate_%s_id_seq MAXVALUE 2147483647; ALTER TABLE rebate_%s ALTER COLUMN id TYPE INTEGER; ALTER TABLE rebate_%s ALTER COLUMN id SET DEFAULT nextval('public.rebate_%s_id_seq'::text);" % (table_name, table_name, table_name, table_name, table_name)
 n=printq(query, n)
 
 print sp
 
if __name__ == "__main__":
 main()

As you can see, there are the three (3) main operations that were followed in the previous post:
1. De-serialization of the primary key
2. Copy in records
3. Add constraint back to database

Run this from the command line with your "table name" as the first argument
(django-jay) PS C:\Python27\home\jtarlecki\djcode\django-jay\rebates> python C:\Python27\psql\query.py zipcodes

You should get the following commands back:

###

QUERY (1):
ALTER TABLE rebate_zipcodes ALTER COLUMN id DROP DEFAULT; 
QUERY (2):
\COPY rebate_zipcodes FROM C:\Python27\psql\zipcodes.csv WITH CSV HEADER; 
QUERY (3):
DROP SEQUENCE rebate_zipcodes_id_seq; CREATE SEQUENCE rebate_zipcodes_id_seq MAXVALUE 2147483647; ALTER TABLE rebate_zipcodes ALTER COLUMN id TYPE INTEGER; ALTER TABLE rebate_zipcodes ALTER COLUMN id SET DEFAULT nextval('public.rebate_zipcodes_id_seq'::text);


###
In the directory where this python script resides, be sure to save your csv files there as well with correctly corresponding table names.  If they aren't, just make some tweaks to the code and you will be all set.

Copy those output queries into your psql shell and you are on your way to semi-automating a miserable task!

Saturday, May 3, 2014

Copying an entire database into a django-based project using psql

This title will be a bit misleading.  I know what you are thinking...

Great this guy has a way for me to define a django model then copy in an entire database--- constraints, defaults, foreign keys and all!

Well, no, I don't have a great way to do that.  Is it possible? Probably. But I don't know how to do it.

I have some tables that I want to preserve the relationship structure. So when I add tables in my django project (models.py) then sync up to the database, I need to to disable the automatically generated primary key field, so I can insert the records into the database via the \COPY command.  Finally, I need to reinstate the serialization of the id field as a constraint.

So, first, connect to the database using the method described in a previous post.

Then create the database model in models.py. In a complex data model situation, I like to bring the tables in one at a time. That means, creating a class in models.py, then syncing to the database one table (or collection of related tables) at a time.

Let's add the States class, which is simply a listing of the United States. These will be used in conjunction with the previously created Zipcodes class:

class States(models.Model):
 abbr = models.CharField(max_length=2)
 name = models.CharField(max_length=35)
 modifieduser = models.CharField(max_length=50, default='admin')
 modifieddate = models.DateField(auto_now=True)
In the powershell window, let's sync this up to the database.
(django-jay) PS C:\Python27\home\jtarlecki\djcode\django-jay\rebates> python manage.py syncdb
Which will hopefully result in some confirmation text saying that the table has been created.

Creating tables ...
Creating table rebate_states
Installing custom SQL ...
Installing indexes ...
Installed 0 object(s) from 0 fixture(s)
Now, connect to that database with psql and drop the constraint of the id field. Basically, the idea here is to change it from a SERIAL field to a simple INTEGER field.  The de-serialization drops the field's ability to be primary key in postgreSQL.

rebates=> ALTER TABLE rebate_states ALTER COLUMN id DROP DEFAULT;
Great-- with the default dropped, now let's copy in all the data.
jaytarle_rebates=> \COPY rebate_states FROM C:\Users\Dorothy\Desktop\states.csv
WITH CSV HEADER;
Now, we change the id field back into a true primary key by setting its default as nextval sequence.  First, let's look at the syntax nicely formatted.
DROP SEQUENCE rebate_states_id_seq; 

CREATE SEQUENCE rebate_states_id_seq
MAXVALUE 2147483647;
 
ALTER TABLE rebate_states 
ALTER COLUMN id TYPE INTEGER; 

ALTER TABLE rebate_states 
ALTER COLUMN id SET DEFAULT nextval('public.rebate_states_id_seq'::text);
Now, just squish all that into one line so you can execute from the psql shell:
jaytarle_rebates=> DROP SEQUENCE rebate_states_id_seq; CREATE SEQUENCE rebate_st
ates_id_seq MAXVALUE 2147483647; ALTER TABLE rebate_states ALTER COLUMN id TYPE
INTEGER; ALTER TABLE rebate_states ALTER COLUMN id SET DEFAULT nextval('public.r
ebate_states_id_seq'::text);
From which we get the following confirmation:
DROP SEQUENCE
CREATE SEQUENCE
ALTER TABLE
ALTER TABLE 
And, voila... our records are in the database and re-synced up with our django project.

Did I copy in a whole database? Well, no. I need to do this process for every table. I know, it sucks.  Perhaps there is a better way...